Wednesday, July 30, 2014

DIY dog teepee

I've seen teepee pins around for kids and loved the idea. Since we have no kids yet, I wanted to try making a smaller version of one for my fur baby to enjoy because she loves to hide under coffee tables and small areas. She likes her privacy.

Materials:
  • Power drill and 1/8" bit (I started off with a smaller 7/64 bit and moved up to the 1/8 but it's not essential)
  • Clamps (to clamp down the dowel to a table while you drill)
  • 5 wooden dowels (I used a 3' dowel with a 1/4" diameter. In hindsight I may have gone with 1/2" or 3/4" because my 20lb dog can easily move the dowels around when she gets happy.)
  • Sandpaper or sanding block (medium and fine grit)
  • Jute rope (mine was from the craft jute and I used a couple of yards)
  • Fabric of your choice
  • Masking tape
Instructions:
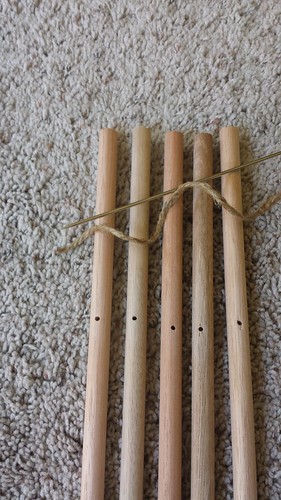
  • With a pencil, place a mark approx 4-5" from the top. This is where you will drill your holes.
  • Clamp down your dowel to your work surface (I clamped on both ends so the dowels have no chance of moving)
  • Using your 1/8" (or in my case the 7/64) bit and drill your hole. I initially used the 7/64 but it was way too small to feed the rope through so I sent back and used the 1/8".

    2014-07-24 11.01.00
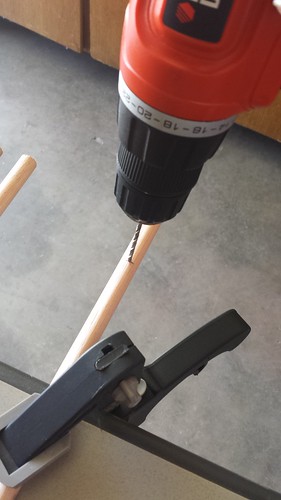
  • After you drill the holes, sand all sides with a medium then fine grit sandpaper to smooth it out

    2014-07-24 11.19.04
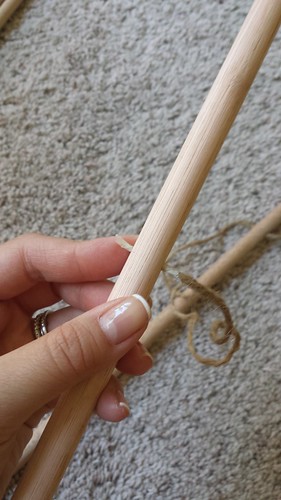
  • Tape the end of the rope with masking tape to help you feed them through the hole. Try wrapping the tape so it very tight and even where at the end where there is no rope. This makes it easy to thread through and for you to pull hard to get the rope through.

    2014-07-24 11.32.15
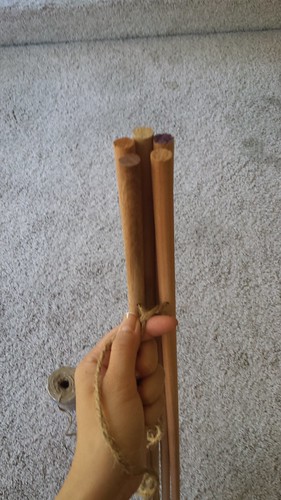
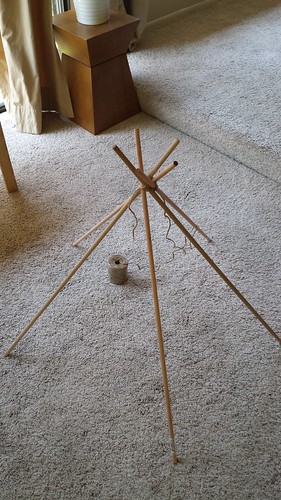
  • After threading through all of the dowels, pull them together like the picture below then begin spreading them apart to create a neat spiral top.
2014-07-24 11.36.42

  • Once you have legs spread out to your liking, begin wrapping the rope around the dowels tightly. Make sure to wrap around each dowel, then at the end, around the entire perimeter of the joint.

2014-07-24 11.42.20

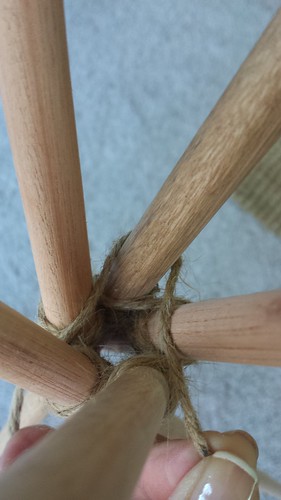
  • Now it should resemble something like the picture below!

  2014-07-25 11.04.03

  • I already had white fabric around so I just draped it over the tent to check the size and arbitrarily sewed it to fit. I didn't want to spend an inordinate amount of time in case she didn't like it...but turns out..she loves it! You can see her little head peaking out below!

2014-07-29 11.34.57

Saturday, July 5, 2014

Cross stitch family portrait

After seeing this cute idea from Martha Stewart living, I decided to set out and make my very own little cross stitch family to hang on our walls.  I don't have any experience, at all, with embroidery stuff (that's how little I know).  So I dug up my little craft needles and found a blunt needle that had a large eye that looked like it was for embroider and just used that.  I read somewhere that you can also use tapestry needles (they also share the blunt tip).  I don't have those nifty cross stitch programs I read while trying to figure out how to get started, instead I just used excel and made the cells into squares and colored the square to draw out my plan.  In my opinion, this is far easier than coloring in graph paper. I was able to make about 10 different iterations of each person and outfits really quickly. This is extremely convenient for my type-a personality. 

2014-06-08 17.04.58

For this project, I chose to go with DMC's Charles Craft 14 count Aida in Natural because I have a little white dog I needed to stitch.  She would have been a ghost on a white Aida cloth.  She is still hard to see, but it's not bad and I wouldn't have done it differently.  I followed these directions to teach myself how to make the basic X but I did not separate the strands.  I just used the whole floss and I think it turned out pretty great.  I think real cross stitchers would scoff at this, but I liked it looking more full.  It's subjective.  Yes they look less like X's but they have this pearl look that I liked when I researched around the web.  I also did not follow the instruction to stitch a row in the link above because I read somewhere that it may give you uneven stitching.  I have no idea if that is true, I just picked one advice and followed it. 

2014-06-15 11.24.25

For my hubby, I stitched all the black first, then went back and stitched color by color.  In hindsight, I would have just switched colors as I went because the back got insanely messy and difficult to navigate. It was very frustrating. When I moved on to work on myself, it was a lot easier to just switch colors.  This is really hard to explain, but once you get working, you will know exactly what I'm talking about. Or maybe not...this is my first project after all!

2014-06-16 09.26.04

There he is, in all his glory...with no arms of legs!

2014-06-19 11.49.10

You can sort of start seeing what I mean by just working from top to bottom and not doing all of one color first on the girl above.

2014-06-19 19.23.20

Nearly finished!

2014-06-20 13.46.48

Finished! I wanted to stitch our family name at the bottom but I wanted to wait till I could fill in the rest of our growing family before adding the finishing touches. I can still frame it as it is.  I cut this off into a square then zig zag stitched the borders to keep the edges from fraying. 

Note on back stitching:
  • I back stitched around our dog to help bring her out a little more with a very light gray. It doesn't show up in pictures but it did make a noticeable difference.
  • I also back stitched the red sandals.  I used 2 strands of plain ol' red to make it nice and thin so it doesn't just look like I'm wearing red shoes.


For your reference, here are some of the colors I used.  All are DMC floss.
Skin = 948
Black = 310
White dog = B5200 (snow white)
Female mouth = 3328
Male mouth = 778 (but this ended up way too light and blended in with the skin color. I rectified this by ever so slightly coloring it with my benetint makeup...so definitely go brighter or something)

Thursday, July 3, 2014

DIY diamond tufted headboard

I made this headboard awhile ago but never had a chance to post it. I have the step by step photos somewhere on my DSLR but if I am ever going to put a picture of it here on the blog, it's going to have to be the poor quality from my phone! For detailed instructions, follow the tutorial from Addicted to Decorating. Her blog was my HG for this project and I nearly followed it 100% of the way.  The only changes I made was the length of the board.  I also plan to stick some 2 x 4 wood legs on this baby ("I" = my husband) rather than using the hanging contraption that is described on her blog.


2013-11-23 10.26.55 

Since I don't have workhorses, I used to chairs to help me prop up the entire board. This project is much more digestible when you have a helper (aka husband) to help with the heavy lifting. Here I have already made my holes in the board and cut out the foam above the hole.

2013-11-23 11.25.11

This is when the tufting fun began...not. This was probably the hardest part. Not the assembly of 60 covered buttons...but the installation of them!

2013-11-23 12.11.30 

Half of the rows completed. Now we go back and tuft the center of each of the pucked areas to make the diamond shape!

2013-11-23 16.25.52

...and here it is completed in all its glory. Too bad it is still laying against a wall in the guestroom waiting for the legs to be installed. I'm guessing by the time that happens, we will have already replaced our bed.  We've been dying to get a King sized bed to fit our need to sprawl out when we sleep.  It is on the list to get for our 3rd anniversary. We wanted to celebrate our 3 yr anniversary by happily having more space in between our sleeping bodies. The irony. 
Related Posts Plugin for WordPress, Blogger...