Thursday, September 6, 2012

Wedding invitations complete

20120906-IMG_1636

I finally completed my friend's 230 wedding invitations! HOORAY! Balancing these invitations on top of school and work, at the time, was a tremendous accomplishment. You know, not going mental and all. But after some drastic life changes, I am much less of a nervous wreck all the time.  I’ll try to document my crafting as time permits, but posting has become lower on the long list of priorities.

Invitations were designed on Adobe Illustrator and paper materials used were:
  • Solutions Linen Envelopes A-7 70# Recycled Linen Test Envelopes 250/box – Color: Natural
  • Classic Linen Text and Cover-8.5x11 80# Cover 250 Sheets / Pkg – Color: Classic Natural White
  • Curious Metallics Text and Cover-8.5x11 Cover 25 Sheets / Pkg – Color: Violette
allisons invite

What else have I been up to? Trying not to be killed by a bear 15-20 ft away whilst walking through the meadows.

Sequioa bears

Sunday, April 22, 2012

Wedding invitations - WIP -

Aside from planning my own wedding and finally finishing up all the crafty tid bits I committed to, I took on another project. Insane, I know. One of my dear childhood friends is getting married this year, too, and I decided that I would make her invitations as her wedding gift. All 200+ of them...from start to finish. I started off showing her a couple of designs (chevron, brackets, polka dots...) once she gave me an idea of what she liked. Ultimately, we ended up with:

invitation design_ab

And no invitation is complete without a monogram:

monogram_ab

Saturday, April 21, 2012

Super easy fried chicken

Easy fried chicken leg meat

My mom always makes the tastiest fried chicken at home, and effortlessly at that. Turns out, all you need is this secret ingredient: 

Easy fried chicken leg meat

You can find sweet potato powder at your nearest Asian grocery store, 99 ranch market for us. No real recipe here.  I used skinless, boneless leg meat and marinated it with sea salt and fresh ground pepper in the refrigerator for 30 minutes.

Easy fried chicken leg meat

Directions? All I did was blindly pour the powder in the super Asian plate my mom gave me (I really need new prep plates) and coat the pre-seasoned chicken leg meat.

Easy fried chicken leg meat

Friday, April 20, 2012

Garlic spinach and mushroom

Sauteed garlic mushroom and spinach

I have been trying to cook more lately because I was sick of eating the same 5 things my mom made and gave us in large quantities.  Don't get me wrong, I love free food (who doesn't?) but it gets to be too much when it's all you eat. We ended eating the same thing for days, not finishing the food and throwing it away.

Sometimes I follow recipes and then there are nights like these, where there's left over fresh produce and I throw something together. Today, it ended up being pretty good, so I thought I'd share this super easy sauteed dish! (The food in the background: garlic-chili crusted salmon and thai coconut curry shrimp-recipe on salmon to come)

Ingredients:

8 oz mushrooms
4 cups of baby spinach
2 tbs red wine
1/2 head of garlic, minced
1.5 tbs butter
1.5 tbs flour

Directions:

1. Melt the butter slowly in pan, when all is melted, throw in the garlic and saute for a minute
2. Just as the garlic is turning a tad golden, throw in the mushrooms, saute for 3-4 minutes until almost soft
3. Sprinkle flour over, saute for 1 min

Sauteed garlic mushroom and spinach

4. Add wine, cook for 1-2 mins

Sauteed garlic mushroom and spinach

5. Toss in spinach and cook until spinach is almost all wilted and immediately dish

Thursday, April 19, 2012

Baked Coconut Shrimp

Baked coconut shrimp

Ingredients:

1 lb of large shrimp, peeled and deveined
1/4 cup of corn starch
2 tbs of flour
1/2 tsp cayenne pepper
2.5 cup sweeten coconut flakes
2 egg whites, beaten till foamy
1 tbs olive oil

Directions:

1. Preheat the oven to 400 degrees
2. Spread baking sheet with olive oil (I used my Misto)
3. Rinse shrimp and dry with a paper towel
4. Combine corn starch, flour, cayenne pepper in a bowl
5. Pour coconut flakes in a separate bowl
6. Dredge shrimp in dry ingredients first, dip it into the egg whites, then roll it in the coconut
7. Place shrimp on baking sheet and repeat for the rest of the shrimps

Baked coconut shrimp

8. Bake shrimp for 10 minutes, take it out and flip them all over, and put it in for an additional 10 minutes

Baked coconut shrimp

Sunday, April 15, 2012

WIP: Appliqué quilted tree leaves guestbook

heart tree

Sifting through all the creative and unique ideas for our wedding guestbook, I finally found something we loved and wouldn't just end up collecting dust in the garage or attic. We loved the thumbprint guestbook ideas, but we really didn't think we'd want to hand a poster up forever and the transportation of the poster from California to Maui would be more difficult. In comes the quilted tree! My future MIL is graciously helping for this project as she is a quilter and knows appliqué. I've only watched youtube videos and am pretty sure it'll come out look like my 8th grade sewing projects. I'm responsible for the look and design of the tree and it'll be handed off once I have ironed on the design to look similar to the inspiration photo above.

Materials:

Fusible wedding (I used Pellon Wonder-Under)
Iron
Fabrics
Cardstock


Guestbook tree quilt

1. Cut out the shape of your leaves on the card stock as your template
2. Use your template and trace leaves on the smooth side of the fusible webbing

Guestbook tree quilt

3. Prepare the iron and cut out the whole piece of webbing sheet that contains the leaves. Do not cut out each leaf yet. I drew them as close as possible as white space is just wasted webbing.

Guestbook tree quilt

4. Iron on the wrong side of the fabric to the rough side of the webbing. Make sure the iron is clean on the bottom.

Guestbook tree quilt

5. Once webbing is adhered, cut out each leaf.

Guestbook tree quilt

This is roughly what the quilt or pillow will look like. Since we are having a destination wedding, this is the easiest and lightest item to transport. No other parts of the tree will be coming (or made) with us, just the leaves. The guests will be asked to sign the leaves with a permanent fabric marker and there is enough space for a little message.

Warning: Do not use a sharpie marker for fabric expecting it to stay. Trust me.

Sunday, April 8, 2012

Paper cut table numbers completed

Remember those paper cut table numbers I started to make for our wedding and even posted a tutorial on? Yeah, that one. Well, I finally finished and made the last two! Making the total a whopping four!

Paper cut table numbers

I have finally finished up many of the projects I started for our wedding about half a year ago. I have this problem of starting one great idea, then leaving it after its half completed and not getting back to it till weeks/months/years later. The fact that these projects tie into our wedding in May is driving motivation to actually complete them in a timely manner.

Paper cut table numbers

I practically demanded we have no more than 4 tables because I dreaded making a whole other number.

Friday, April 6, 2012

DIY Luggage tags

DIY luggage tags

Since my last DIY luggage tags post, I finally completed all of them! Yellow are for the ladies, and grey are for the gents. I made the tags myself using Microsoft Word and retrieved the airplane image from somewhere on Google. If you are interested in the template, email me and I'll be happy to share!

One tip on making these luggage tags, don't push out the corners TOO much. I made the mistake of doing that and some of the corners look like they are flared out. But I'm not about to remake fifty of them. Happy Friday!

Tuesday, March 6, 2012

New needle felted owls, penguins, and a robot.

An overdue post on some needle felted friends I made during the beginning of the wedding planning frenzy that I never shared.

Needle felted wedding toppers

Only the gray tuxedo owl (right) is newly made. I am using the bride for my own wedding cake topper since she looks tropical and we are getting married in Maui (hooray!). I am only debating who the groom should be. This original black owl, or this gray tuxedo owl! Decisions, decisions...

Needle felted owl

I suspect he will have a female friend coming soon-ish.

Needle felted penguin

I adore this penguin and his gigantic forehead! I really want to make his a female friend with a pink bow.

robot friend

For a couple of days, I was really into androids because of a keychain I stole borrowed. I decided to felt an android...as you can see, it does not quite look like an android. If I separated the legs, it wouldn't be able to stand, and I wanted a standing android-but that failed. So now I have a green robot with no eyes. But, that will change real soon.

Now, I only keep a listing or two on Etsy and post a gallery up of available items for sale on my picasa.

Tuesday, February 7, 2012

Homemade Greek Yogurt

Homemade Greek yogurt sounds like it would be super difficult, but it is so easy. Seriously. All you need is two ingredients: Milk and bacteria. I used this yogurt to make froyo with our yogurt maker. It's funny to think that all of this make-my-own-yogurt came to me one night when I was really craving Pinkberry and wanted to make my own tangy froyo.

Homemade Greek Yogurt

Ingredients:

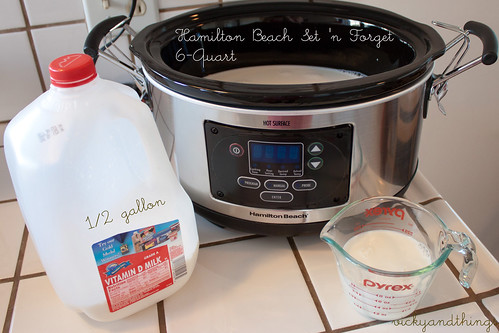
Whole Milk (Or 2%, 1%, skin, goat milk-I used whole)
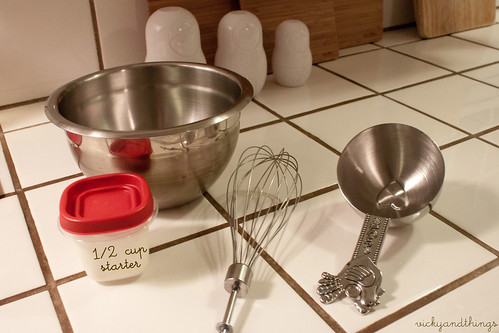
0.5 Cup plain yogurt with active cultures (I used half a cup of my previous batch here)


Homemade Greek Yogurt


You will also need a bowl, whisk, 1C measuring spoon, and colander (not pictured)

Directions:

1. Pour half a gallon (8 C) of milk into the crock pot and set to low for 2 hours and 30 minutes. Heating the milk changes the protein structure to be able to make yogurt.

2. Unplug the crock pot and leave it in when the time met and let the milk cool for 3 hours. The milk needs to cool down to 110-120 degrees so it is not too hot (kills the bacteria) or too cold (bacteria won't get busy).

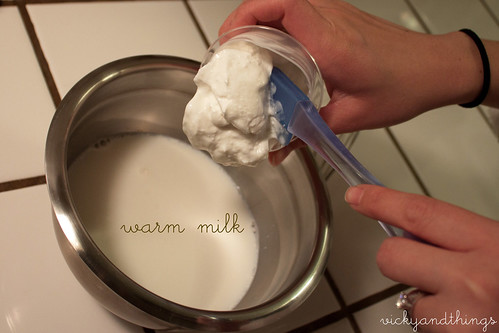
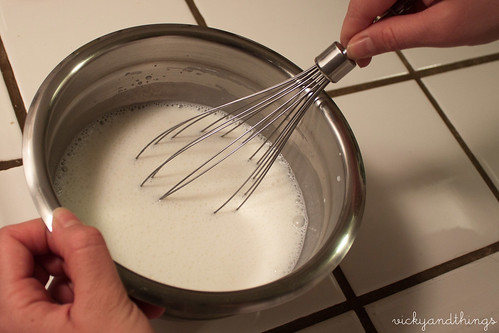
3. After 3 hours, take one cup warm milk and half cup of plain yogurt and mix in a separate mixing bowl and stir well.

Homemade Greek Yogurt

Homemade Greek Yogurt

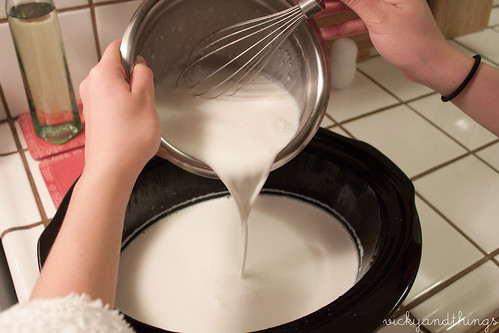
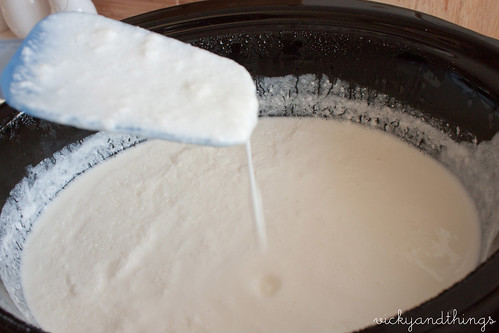
4. Dump mixture back into the crock pot and stir.

Homemade Greek Yogurt

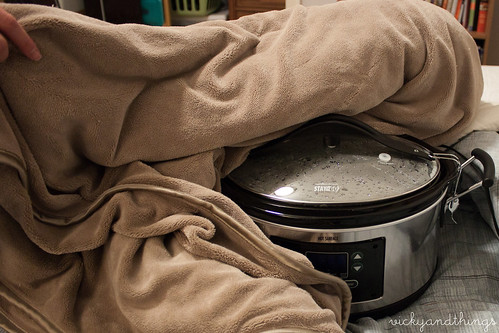
5. You'll need to maintain the temperature and keep the mixture in the 110-120 temperature range for 10-12 hours. I put a thick and heavy blanket around the pot and let it culture overnight.

Homemade Greek Yogurt

Also put the comforter over the bundled crock pot for additional insulation.

Homemade Greek Yogurt

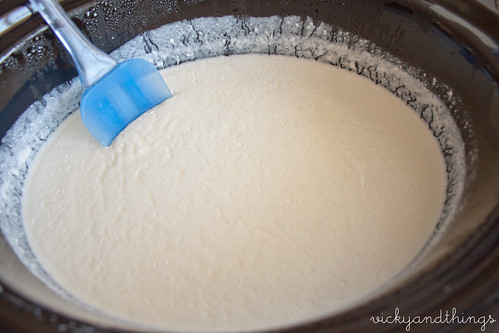
In the morning, you should get yogurt! Or what low-fat yogurt looks like. (Ella likes to sneak in all our pictures, somehow)

Homemade Greek Yogurt

You'll notice the liquid on top and in the mixture. That is the whey and you will be separating that out when we strain, next.

Homemade Greek Yogurt

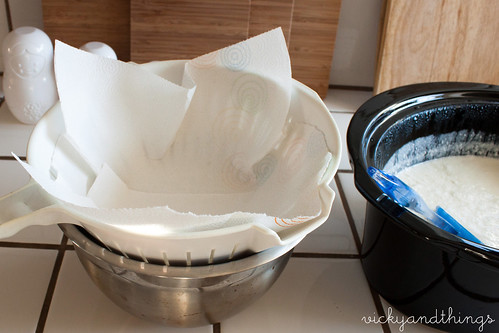
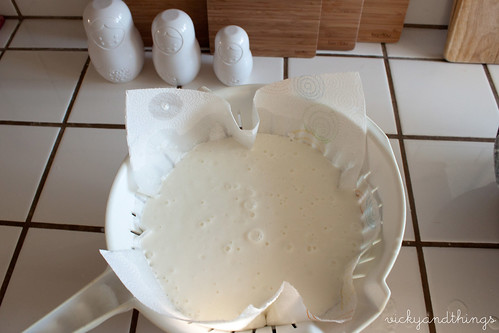
6. Line a colander in paper towels or cheese cloth. The latter is the proper way, but I don't have any on hand and I read this was a perfectly fine substitute. It has been working perfectly fine for me!

Homemade Greek Yogurt

7. Ladle the yogurt in and put it in the refrigerator while the yogurt strains. I strain the yogurt for approximately 2 hours. You can strain as much, or as little, as you like the consistency of your yogurt to me.

Homemade Greek Yogurt

The whey by-product of your yogurt making can be used in almost anything that calls for milk. You can find more details at thekitchn.

  • Refrigerated yogurt will keep for 7-10 days in an air tight container.
  • Add a little bit of sugar if you don't like plain yogurt in all its glory

Monday, February 6, 2012

Roasted parmesan green beans & Spinach bacon stuffed mushrooms

Stuffed mushrooms and Parmesan roasted green beans

Stuffed mushrooms and Parmesan roasted green beans

The other night, I made Roasted parmesan green beans and spinach and bacon stuffed mushrooms from skinnytaste.com, and we practically inhaled our dinner. Instead of buying whatever meats and produce is on sale when I go to the market and going to 5 different markets to get the best value for whatever I need to buy and making my fiancé (any myself) crazy, I am trying a new approach. Buy whatever you need in 1-2 stores. I don't know if this will stick, but so far, so good. I'm less stressed after work since I have fewer errands to run and we are not tossing out food we never end up cooking. I never use to cook with recipes, and now, I am trying to cook with more variety. Let's face it, you can only eat Chinese food for 25 years until you say "enough is enough!"

Saturday, February 4, 2012

Breakfast: fried egg on toast

Fried egg on toast

This morning I was craving Croque Monsieur, but I wasn't about to get out of my warm bathrobe and run to the store to get ham and Guyere. All I had was bread, eggs, parmesan, and mozzarella.

Nostalgic morning wishing I were back in Paris again.

Ingredients:

1 slice of whole grain bread
1 egg
3 tbsp canola oil
1 tbsp parmesan
3 tbsp mozzarella
1 scant pat of butter
salt and pepper to taste

Directions:

1. Put the butter on the toast and set it in the toaster oven just for 1 minute to warm the bread and butter. Spread evenly.

2. In a 1 quart sauce pan with a lid, put the oil in and turn stove on high heat.

3. Sprinkle parmesan on the toast, then mozzarella on top. Put it back into the toaster oven for about 4-5 minutes, until it is slightly crunchy.

4. Sprinkle salt and pepper to taste on the egg.

5. Now, your oil should be very hot. Crack one egg (or two if you're hungry) and quickly cover with the lid, leaving it slightly ajar**. Once bottom is crunchy, flip egg over for 4-5 seconds and quickly put your egg on the toast.

5. Break the yolk. Spread it all around, then devour.


**The trick is to leave the lid open so it doesn't fully cook the egg right away. I usually crack the egg into a bowl and use the bowl to dump the egg in so I don't burn myself. You are not making a sunny side up egg. You are making a fried egg, where the bottom and sides are crunchy, yet un-burned, and the egg yolk is still raw. This takes practice, believe me.

Wednesday, February 1, 2012

DIY Wedding Invitations Tutorial

DIY wedding invitations

Materials:

Measurements:

Before we get into detailed instructions, here are the major measurements:

DIY wedding invitations

Pocket fold Instructions:

1. Cut your 8.5" x 11" card stock down to 7" x 11".

DIY wedding invitations

2. Score the paper parallel to the 7" side at the 2" (Fold A) mark and at the 7" (Fold B) mark:

DIY wedding invitations

DIY wedding invitations

3. Mark 1.5" left of Fold A and 3.5" down the edge of Fold A with a pencil.
DIY wedding invitations

Line up the two points with your ruler and cut. These cuts give you the angled flap.

DIY wedding invitations

4. Flip card over so the bump from the scoring is facing up and Fold B in, then Fold A in.

DIY wedding invitations

5. Using the same card stock, cut 4.25" x 4 15/16" for the pocket.

DIY wedding invitations

Score 0.5" from the edge on the 3 edges as shown.

DIY wedding invitations

6. Flip it over with bump side up and cut the dotted edges shown

DIY wedding invitations

Fold in.

DIY wedding invitations

7. Cut the double sided tape in half. Using .25" tape, affix on all tabs. If you leave it at 0.5", it will go over the edge.

DIY wedding invitations

DIY wedding invitations

8. Place pocket onto the right panel of previously made folder.

DIY wedding invitations

Ta da!

DIY wedding invitations


Border instructions:

1. Using your border color paper, cut paper to 4.75" to 6.75" (gives you 1/8" edges all around). This is for the main invite in the center of your pocket fold.

DIY wedding invitations

2. For your RSVP/Insert for the pocket, cut paper to 3.75" x 4 7/8"

3. For your Monogram, cut paper to 1.75" x 1.75"


Assembling/Final touches:

1. Cut ribbon to ~11"

2. Using 1/2" double sided tape, affix border mat onto pocket fold for the main invite, then invite onto the mat. Affix RSVP/insert onto its border mat and slide the matted RSVP/insert into its pocket.

3. Close the invite to put ribbon finish. Wrap ribbon around pocket fold snug, not too tight, and use double sided tape to hold together.

DIY wedding invitations

4. Put the border color paper behind the ribbon, against the pocket fold and tape down.

DIY wedding invitations

5. Put the monogram on top of the ribbon and tape down.

DIY wedding invitations

Voila! Now do this times 50, 100, or 200.


Related Posts Plugin for WordPress, Blogger...